This document is a series of recommendations and specifications for the installation of the Model RFlex welding machine. To ensure a smooth installation and optimal performance from your welder, please follow the recommendations and specifications precisely. Due to complications that may arise while under warranty, Miller Weldmaster Application Specialist will not install a welder into a site that is not adequately prepared. To avoid any postponements, please ensure that all requirements specified in this document are met before the Miller Weldmaster Application Specialist arrives.
Selection and preparation of a site suitable for the installation of the client’s Miller Weldmaster welding system is the sole responsibility of the client. Miller Weldmaster Corporation offers the following advice and specifications as guidelines for site preparation. The last page of this document is a PRE-SITE survey form that MUST be completed and signed by the client’s authorized rep, and returned before installation can be scheduled. Miller Weldmaster will advise any changes that may be required in your site preparation, and establish an installation schedule. We at Miller Weldmaster look forward to meeting your staff and ensure a successful installation and training.
Pre-Installation Document
1.0 Specifications
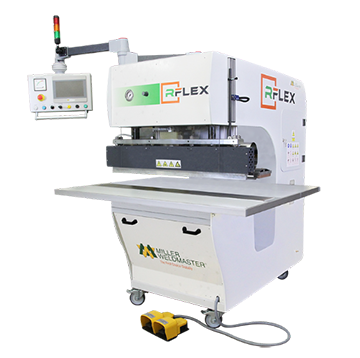
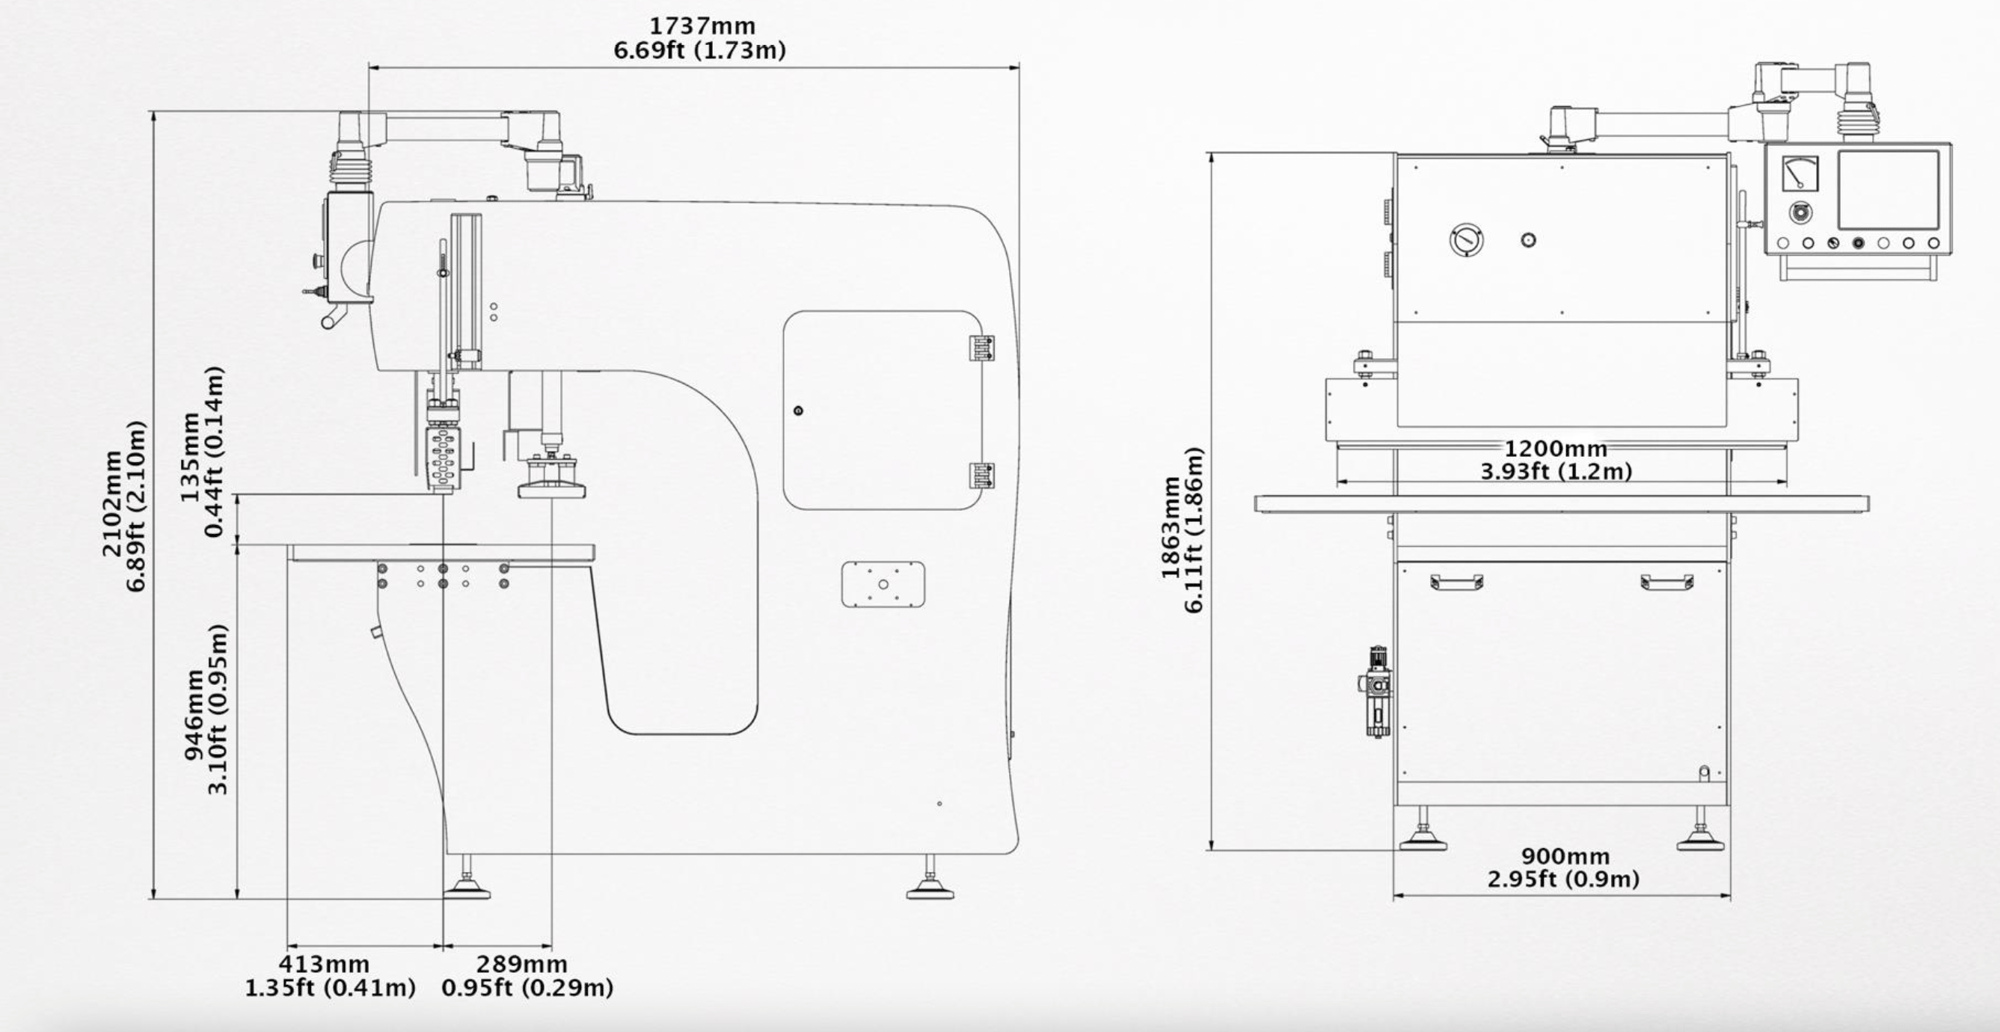
| RFlex | |
| Height | 2.4m (94.5 inches) |
| Width | 1.7m (66.9 inches) |
| Length | 1.97m (77.5 inches) |
| Weight | 1,100kg (2.425 lbs.) |
2.0 Installation & Physical Plant Requirements
2.1 Physical Plant
If you would like assistance with the placement of your machine please email service@weldmaster.com or call 330-833-6739 your work floor layout with dimensions. Be sure to include in your floor layout other pieces of machinery as well as power and air supply location. This will help with workflow concerns.
2.2 Environment (RF/HF)
Radio Frequency Interference: Due to the potential of any stray RF interfering with surrounding electronics, customer is responsible for proper shielding of electronics should it be required.
2.3 Floor Plan
The minimum floor space requirements are the size of the machine. Actual floor space for maximum production capabilities is the desired goal. Most of the additional space should be allocated to an area in front and side of the welder.
3.0 Power Requirements
The RFlex can accept the following power sources:
Warning: Only a qualified electrician should connect the electrical power and any local certifications above the normal electrical standards will be added at the expense of the customer.
| 240 Volts - Three Phase - 60 Amp. |
| 400 Volts - Three Phase - 40 Amp. |
| 480 Volts - Three Phase - 40 Amp. |
The requirement for AMPS may vary depending on machine requirements. Consult your quotation for the exact amount required. If outside the USA, your power configuration may vary.
4.0 Compressed Air Requirements
| 2cfm @ 120 psi |
The RFlex does not need large volumes of compressed air, however some air is required to drive the pneumatics of the welder. Since these cylinders are activated and de-activated with bursts of air, a continuous volume of air is not needed. The RFlex includes an in-shop air supply valve that allows for quick connects and disconnects to your shop air supply. Due to the number of different style airline connectors, a male quick connect is not included. You will want to select a male quick connect with a 1/4” NPT (National Pipe Thread) to match your female quick connect.
NOTE: If you do not already have compressed air, a small portable unit capable of the above pressure and capacity will be satisfactory.
5.0 Shipping
When the welder arrives at your facility, inspect the welder and crate for signs of any damage that may have occurred during shipping and verify the package count against the packing slip. Look for the Tip n Tell to see if the crate was mishandled. If there is damage, file a complaint with the shipper and inform Miller Weldmaster immediately. If a damage situation arises, do not sign the shipping receipt of the carrier without documenting the details of the crate, machine etc. FURTHER, it is critical to take photos of the machine for damage compensation. If needed, schedule a freight inspector to be on site when the Miller Weldmaster Application Specialist arrives to install the system.
6.0 Training & Installation
6.1 Committing Time
In order for the training to be of any value, it needs the undivided attention of the operators and the uninterrupted use of the welder. This means that the operators must commit all their time during the training session, and not try to do other work on the side. It has been our experience that by designating one or two responsible employees to take an active role in not only training but also learning all aspects of the welder will ensure a better production life out of the welder. We understand that committing this amount of time can be very difficult in a production environment, but failing to do so can be costly. One full day for installation & training is what is usually required. It is a relatively small investment when compared to the machine down time and product waste that can occur when untrained operators are used. We will train on the basic functionality of the welder. However, rate of production and confidence with your welder will be greatly improved with practice by your staff. It is your responsibility to become familiar with the welder and its capabilities.
Therefore, we request that you plan for a minimum of TWO full days when scheduling. The technician installing and training will speak English. The translation to your native language will be your responsibility.
6.2 Minimum Materials Required for Training
The following is a list of materials required so that the maximum benefits of your training and installation can be met.
- All different types of fabrics you will be seaming or plan to use in the future.(Most fabric suppliers will be glad to provide some sample material)
- Enough material to run one or two hours worth of practice seams.
- Enough material to make at least one of every product you produce.
6.3 Pre-seaming Considerations
The pre-seaming portion of the seaming process is very important to image quality and your overall profitability. Properly prepared pre-printed images (if you are seaming after printing), and fabrics can improve the quality of the printed material, save time and reduce costly reprints. A properly seamed Awning or Pole Pocketed Banner/Billboard using the RFlex will provide your customers with a visually pleasing product.
6.4 The Main Operator
The RFlex requires at least one main operator who will be responsible for the operation and maintenance of the welder. The candidate should be a responsible employee and will need certain skills. He/she will be expected to be able to maintain the welder and perform a routine maintenance. This person will also be the communication link with our Support Department, and should be capable of phone-assisted problem solving and basic repair.
The main operator will be important to the operation of the welder, and should be selected with great care. The main operator should possess basic hands on mechanical aptitude & some very basic technical background.
6.5 Other Operators
In addition to the main operator, other operators will be required for more than one shift and as helpers. It is not necessary that these operators possess the skill level of the main operator. However, anyone working with the welder should show a mechanical aptitude and have some experience with seaming or sewing. It is important that the person have an eye for distinguishing between good seams and bad seams.
6.6 Goals for the Operators in Training
To understand all the controls and functions on your welder, understand and perform basic maintenance and to understand and be able to achieve a good weld for each type of material & to produce an end product in a timely manner.
The below form must be returned before the machine can be installed. Please return this form as soon as possible. Please read through each requirement, and complete the Pre-Installation Acknowledgement below to confirm you are ready for install:
1. Do you have the applicable power requirements? Please see Serial tag for correct power connection
| 240 Volts - Three Phase - 60 Amp. |
| 400 Volts - Three Phase - 40 Amp. |
| 480 Volts - Three Phase - 40 Amp. |
2. The machine will be at the location of the shipping address for install.
3. The machine will be removed from crate (if not, please comment below why not).
4. Adequate machinery and a dock are available to unload machine.
5. The air supply is in place and ready to be attached to machine.
6. The power source is in place and ready to be connected the machine.
7. I have adequate compressed air, as referred to in the guide.
8. The correct measured incoming voltage of the electrical power source is (or will be) connected to the machine.
9. I will you provide all material & employees needed for proper training.
10. Please leave comments in the below form if any special considerations are needed for this machine install, or if you have any questions that need to be answered before we are on site.
Your installation and training time are valuable. If you state that you have a power source, please ensure that it is connected prior to the MW Field Service Engineer is scheduled on-site. Any extra days required for the installation will be billed at our current shop rate per hour plus additional travel expenses.